Tuesday, April 27, 2010

Ladybug lost her dots!

First, thank you Teach Preschool for the wonderful idea and song. Here is how our little ones enjoyed the activity!

This is a great counting, arts and crafts activity to do with preschoolers. I did this activity for our Mommy and Me classes that last about 35 minutes so I pre-cut all the pieces to allow for time.


I used things around the classroom to make this activity. I used a sand bucket to make the circle for the body of the ladybug and a bubble bottle for smaller circles for the dots. I traced them on black and red construction paper and cut them out. I also used googly eyes, pipe cleaners, tape, glue, and a white crayon.

Have kids glue the ladybug together, everything but the spots. Hide the spots around the room as your read the song below. Once they have found some spots let them glue them on their ladybug. I sing the song several times so the kids will sing it as they are looking around the room. Very fun! I have them write numbers on their spots with a white crayon once they have glued them down to practice writing their numbers.


Little Ladybug Song Copyright © 2010 Deborah J. Stewart

Little Ladybug on the ground

Doesn't make a sound.

Looking for her ten black dots

She lost them on the ground.

One black dot Two black dots Three block dots And four.

Five black dots Six black dots She's looking for some more.

Seven black dots Eight black dots Nine black dots And ten.

The ladybug who lost her dots has found them all again!


Wednesday, April 14, 2010

Tulip Garden

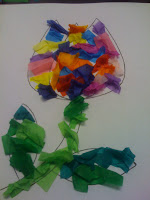
Spring is in the air! Celebrate April's beautiful flowers by making a fun Tulip Garden with your kiddos! Teach fine motor skills by crumbling tissue paper and gluing it to a tulip! I got this idea from Preschool Playbook and thought I would try it out. They turned out so cute and parents and kids both had so much fun making this craft!

Cut up colorful tissue paper into squares.


Let the kiddos crumble and play with the tissue paper has they glue it down to the flower.


Once they are finished line them up just like they would be in a flower bed and enjoy your beautiful spring tulips!


Thursday, April 8, 2010

A Shapely Rainbow

We have added this bright colorful rainbow to our ABC's and 123's center. This is a work in progress and will take a couple of weeks to complete. This past week the kids loved working on our rainbow a little bit each day. (2 and 3 year olds)

I made up a sad story of how this big rainbow lost all of her color and she needed help to find her color so she could be bright and happy again! I wonder who could help her.... hmmmm???

First, draw a big rainbow on white bulletin board paper with a pencil. In each section write the color words from top to bottom; red, orange, yellow, green, blue, and purple. For each color make different shapes; I used hearts, triangles, circles, stars, ovals and squares here are my shape templates that I made so you don't have to. (it does take some time to cut out so grab a glass of wine, a good movie and start cutting) I printed the shapes on cardstock and mixed them all up in a small plastic container and when I tell the sad story of how our rainbow lost her color, I get all happy when we find the colors and dump them in a big pile and let the kids one at a time tell me the shapes and color of each as they glue it in the right space to start the process. The bigger the rainbow the better because over the next couple of weeks the kids will work on it. We will celebrate the rainbow and her colors when the center is empty and the shapes have all been glued onto the appropriate sections.

For older kids you can assign groups a different color and shape and have them cut out and add one color at a time and once all the groups have gone you will see the colorful rainbow take its shape.

I will post an updated photo when I rainbow is finished next week!

Enjoy!

Thursday, April 1, 2010

Easter Holiday Craft


We absolute love to mold Plaster of Paris around here! When a fun holiday rolls around you can be sure we are painting a craft made from silicone cookie molds. Silicone molds you can find in your local grocery store or craft store and work perfect for this craft. It’s a bit messy with the plaster, so I mold them the day before and let the kids paint them throughout the week.

Here’s how you do it! DAP Plaster of Pars is mixed 2 parts plaster and 1 part water. I mix it in a tall plastic glass, easy for pouring into the molds, and mix with a paint stick. It should be mixed until smooth, not too runny and not too thick. Pour into molds leave a little room on top that way they come out even on bottom. Let dry for about an hour before you pop them out. Once you pop them out lay them out on a paper towel and let dry for another hour or two. Then enjoy painting them anyway you like. They will get lighter over the next couple of days as the plaster dries all the way.