Thursday, November 15, 2012
Google Chrome Read and Write App
It's new! It's Awesome! Kids and teachers are loving it!
This app is helping bridge the gap for our struggling readers and writers. Google has developed a system that allows you to collaborate with others while providing a contextual spell checker, a word dictonary, a picture dictionary and a text-to-speech program (reads back your text), ALL in one document! This is huge for our struggling readers. Students are able to hear what they write and see a picture for a word they type, this is amazing! Example. I ate ice cream for "desert" or "dessert". Not sure of the correct word to use? Then use the picture dictionary and choose the correct spelling!
You can find the app in the Google Chrome's Web Store FREE! It works with Google Chrome's web browser in Google Drive with all of Google Documents.
Check out Leander's Assistive Technology In Action blog, for an example of Google's Read Write App and how technology is being used in the classroom's of Leander ISD!
Sunday, November 11, 2012
Cognitively Guided Instruction
What is CGI??
Understanding how children's mathematical thinking develops and reflection on how to help children build up their concepts from within (Carpenter 1999).
Children's Mathematics Cognitively Guided Instruction, Thomas P. Carpenter, 1999.
After attending a series of Cognitively Guided Instruction (CGI) sessions, provided by our district, it was a no brainer for me, this is the only way to teach math!! My students turned into little math investigators! They were exploring and discussing math and developing their own understating of addition, subtraction, multiplication, and division.
I promise, if you as a teacher have not tried CGI in your classroom then you have no idea all the math your students are truly capable of and already know!!
The hardest part, as a teacher, will be letting go of the teaching. Once you stop talking and start listening, you will finally be teaching! Seriously, I kept hearing this and it hit home one day when I was with a student who was just not getting the concept of what I was teaching. After trying several different strategies I eventually said, "Okay, you teach me." It became apparent, the misunderstanding, as he was explaining it to me. The CGI for his learning became simple once I stopped talking and started listening!!
Here is link to read more on CGI from the developers. Cognitively Guided Instruction: A Knowledge Base for Reform in Primary Mathematics Instruction
The most importan thing to know in CGI is; there are three levels of developmental strategies.
1. Direct Modeling Strategies- These kids must see exactly how the problem goes! They need to see every number.
2. Counting Strategies- These kids are FINGER counters. They dont necessarily need to see every number, but use a counting strategies to go up or down.
3. Number Fact- Theses kids know facts and know how to get to other facts from "derived facts".
A teacher needs to identify these students and place them into these category and then build their understanding of number sense to move them to the next step.
Don't tell your students how to start a problem. Only help them to "unpack" the problem. You might have to ask a question 10 ways to get them to figure out where they might need to start, but you have let THEM figure it out so they can own a strategie that works for THEM not YOU! Just remember, the one doing the talking is the one doing the learning! So teachers, STOP talking and START listening!
Below are examples of 3rd and 5th graders work, using CGI math problems. You can see the difference in strategies. They all got the answer but in 3 different ways.
Your job as a CGI teacher is guide their thinking and develop higher level thinkers through the use of inquiry! will be posting lessons and centers from my CGI classroom soon!
Understanding how children's mathematical thinking develops and reflection on how to help children build up their concepts from within (Carpenter 1999).
Children's Mathematics Cognitively Guided Instruction, Thomas P. Carpenter, 1999.
After attending a series of Cognitively Guided Instruction (CGI) sessions, provided by our district, it was a no brainer for me, this is the only way to teach math!! My students turned into little math investigators! They were exploring and discussing math and developing their own understating of addition, subtraction, multiplication, and division.
I promise, if you as a teacher have not tried CGI in your classroom then you have no idea all the math your students are truly capable of and already know!!
The hardest part, as a teacher, will be letting go of the teaching. Once you stop talking and start listening, you will finally be teaching! Seriously, I kept hearing this and it hit home one day when I was with a student who was just not getting the concept of what I was teaching. After trying several different strategies I eventually said, "Okay, you teach me." It became apparent, the misunderstanding, as he was explaining it to me. The CGI for his learning became simple once I stopped talking and started listening!!
Here is link to read more on CGI from the developers. Cognitively Guided Instruction: A Knowledge Base for Reform in Primary Mathematics Instruction
The most importan thing to know in CGI is; there are three levels of developmental strategies.
1. Direct Modeling Strategies- These kids must see exactly how the problem goes! They need to see every number.
2. Counting Strategies- These kids are FINGER counters. They dont necessarily need to see every number, but use a counting strategies to go up or down.
3. Number Fact- Theses kids know facts and know how to get to other facts from "derived facts".
A teacher needs to identify these students and place them into these category and then build their understanding of number sense to move them to the next step.
Don't tell your students how to start a problem. Only help them to "unpack" the problem. You might have to ask a question 10 ways to get them to figure out where they might need to start, but you have let THEM figure it out so they can own a strategie that works for THEM not YOU! Just remember, the one doing the talking is the one doing the learning! So teachers, STOP talking and START listening!
Below are examples of 3rd and 5th graders work, using CGI math problems. You can see the difference in strategies. They all got the answer but in 3 different ways.
Counter |
Counters and Direct Modeling |
Direct Modler and Derived Facts |
Your job as a CGI teacher is guide their thinking and develop higher level thinkers through the use of inquiry! will be posting lessons and centers from my CGI classroom soon!
Wednesday, June 27, 2012
Bear Toast for Kids
LOVE, LOVE this easy, fun breakfast toast for my 17 month old and so
does he!! This idea, I know, is not new but it's new to me and WE love
it!
Bananas, blackberries and cinnamon toast are his favorite, so we just combine them in a fun way and GRRRRRR, we eat and enjoy!!
Tuesday, June 26, 2012
Upcycling Old Knife Holder
So I was roaming through Pinterst and found such a great, crafty idea from Roaming Rolfe's blogspot! Thank you for the inspiration!
You know how I love turquoise, so again I found a fun way to incorporate it into my decor! The color is Martha Stewart Lagoon, leftover from a previous project ( Turquoise Armorie)! Here is how I did it! Now my mixer and knife holder all match! I'm loving my kitchen even more!!
Thursday, June 21, 2012
Wooden Photo Project
Want to make some cool gifts for family or friends?! Check out Design By Nicola FB page for a great tutorial on how to transfer photos on to wood or visit her website Design By Nicola.
I followed this easy tutorial from Design By Nicola, Part 1 and Part 2, and then added fun embellishments to mine for Father's Day gifts! Along the way I discovered a cool new way to display family photos, as you can see I was running out of space! I just Velcroed the blocks of wood to our armorie (previous blog before and after armorie ) so I could move them around and change up the design! Easy Peasy Lemon Squeezy!
Super Cool and Fun to Make!!
Tuesday, April 3, 2012
Scented Nail Polish
Strawberry, Orange, Fruit Punch, Banana, Lime!!!!!
Okay, so I saw this scented nail polish and I really wanted to try it! For only $10.00, I wasn't quite sure if it could really possibly smell like fruit. Once I opened it, really all I could smell was a tiny hint of the flavor on top of the strong smell of polish. But once it dried, I could smell the fruit! Some flavors are stronger than others, strawberry and lime, but overall I could smell a hint of fruit. The polish does not go on very smooth and has a matte finish, so I covered it with a sparkly top coat also from Claire's. Overall it was fun trying out the polish! The turquoise -fruit punch was my favorite!
Here are the links to their website of these products.
Sweet Scents Polish Set
Sparkly Top Coat (could not find the actual one (called Disco) on their website but this one is very close)
Sweet Scents Polish from Claire's |
Friday, March 9, 2012
Spring Wreath
It's getting close to spring so it's time to switch out the winter wreath for a fun, festive spring wreath! I made this one the same way as my Valentine wreath.
You can purchase this wreath from me here at Etsy.com or Follow the simple steps below.
Rick Rack Ribbon
Ribbon
Scissors
Felt
Crayon or Marker
Straight Pens
Styrofoam
You can purchase this wreath from me here at Etsy.com or Follow the simple steps below.
Here is what you need |
Rick Rack Ribbon
Ribbon
Scissors
Felt
Crayon or Marker
Straight Pens
Styrofoam
Trace and cut circles |
I use about 150-175 circles |
Fold circle in half |
Fold in half again |
Pin to Styrofoam |
I set them out to make it even as I go |
Add rick rack ribbon first and start to pin circles |
Pin Ribbon in to hang on door |
Add a bow, Hang and Enjoy! |
Thursday, March 8, 2012
Delicious Cake Pops!
My family can't resist these yummy cake pops! I make them, display them and wait for them to disappear one by one! I made a batch this week for our new neighbors that moved in next door. It was a sweet, yummy welcome to your new home gift! Everyone always ask how I keep them from running down the stick, so here is how I do it.
Here is what you need |
These are real cake pops. I don't mix the icing in the cake and use chocolate.
This is the trick! |
Use any cake recipe that you like. Here is the trick, if you don't want them to run down your stick, don't add as much water to your batter. When the direction say to mix in 1 cup of water, only had 1/3 cup water. The batter has to be like dough.
Use a cake pop/donut maker. |
Bake in a cake pop/donut maker, bake 5-6 minutes. Spay with cooking spray each time so they don't stick.
Let cool on a rack. |
Don't ice until completely cool, about 20 minutes.
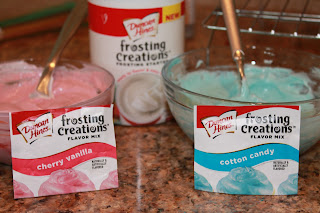
Use any icing that you like. |
I tried new icing flavors from Duncan Hines called Frosting Creations. I split the can into 3 parts and made original, cotton candy and cherry vanilla. They have many new flavors to choose from and actually were very good and easy to use!
Display and Enjoy! |
Sick a stick into the cake ball, be sure not to poke it all the way through. Here, I used beverage stirs because I like the colors, they were the colors of spring. Most groceries stores don't sell sucker sticks so be creative, next I might use pixie sticks.
I also made these for my sons first birthday party but with homemade butter cream icing and they were delicious!
Friday, March 2, 2012
Lollipop Cookies
Kids love cookies and suckers, so why not make cookies on a stick!
My son and I made these fun lollipop cookies for a yummy snack!
Here's what you will need |
Divide dough into 5 equal parts and add color |
Roll each color into smaller balls about the size of a grape |
Combine one color of each small ball and roll together |
Roll between fingers to get a long skinny line about 10" |
Coil dough up, use your finger as a guide to coil |
Insert sticks and bake for 7 mins. Let cool on rack. Add ribbon to sticks |
Decorate and Display |
Eat em up! Yum! |
Caught you sneaking one off the table!! But mom, they are so good! |
Tuesday, February 28, 2012
Silk Dyed Easter Eggs
Silk Dyed Easter Eggs |
This was the first time I attempted to make silk dyed Easter eggs and it sure was fun! A little tricky but they came out pretty cool.
Tie egg with a twist tie or rubber band |
Cover with pillow case and tie |
Cover in plain fabric and tie up tight. I cut up an old pillowcase. Try not get air trapped in there because they will float up when you boil them.
Boil 25-30 |
Display and Enjoy! |
Let them dry on a cooling rack for about an hour. Display them in a fun creative way!
Subscribe to:
Posts (Atom)